Here at DevelopmentNow, we are dedicated to exploring new technology and the many innovative ways to incorporate it with existing technologies to solve creative problems. When we aren’t doing that for clients, we work on “labs” projects to continue expanding our knowledge of emerging technologies and how they all work together.
Project 11
Our labs team was provisioned with the task of building an interactive display that had both hardware and software components. When presented with the task, most of my concerns were all around the hardware – as I didn’t have any experience writing hardware code. The second biggest stretch was that we had a month to actually build this thing because it was going to be used in our booth at TechFestNW. Cool, so, not a lot of time and not a lot of experience, you get the idea.
Without going into too much detail about the display, the application, or spilling our company secrets before our unveiling at TechFestNW: The basic functionality of our application is this – you ask our web app a question, and it responds through an interactive LED display. Now real quick, think about how you might build something like this… got it in your head? Ok good, now follow along as I map out some of our solutions.
Okay, so controlling these lights in our display… how are we supposed to do that? Well, initially we looked into using a microcontroller such as an Arduino but found through another labs project – Bright Pot– that it was relatively unstable when coupled with the various shields. So we moved on to other ideas centered around potential open source LED drivers.
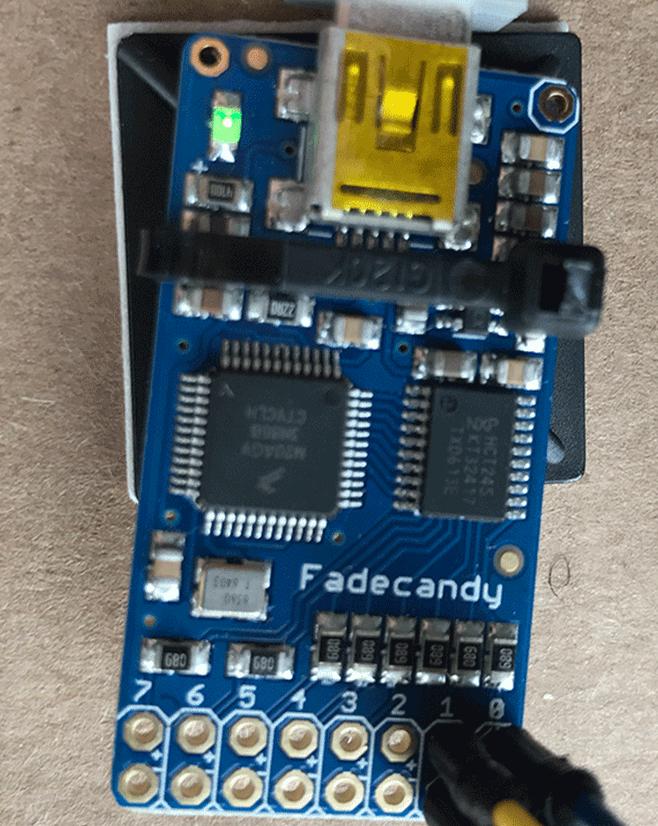
Enter FadeCandy
FadeCandy is a simple easily configurable piece of hardware that can handle individually addressable LED strands. They have a lot of code already written which allows you to get started with the lighting components without having to do copious amounts of work.
Initial setup? Wire up a string of LEDs to the FadeCandy controller and get the lights to turn on and off with a command from my laptop. Sounded easy enough. After a little bit of soldering, git clone-ing, and sudo make-ing, we had the FadeCandy server up and running and it was as simple as it sounded. We could now turn the string of lights on and off with commands through the FC server. This was a truly an exciting moment and proved to be less daunting than imagined.
Now, onto building a RESTful service that could interact with the controller. Of course, we all know that USB controllers require a physical serial connection to the device; what were we going to do about controlling the LEDs over the internet? The go-to solution for RESTful services has always been to stand up an AWS server, throw some code on it and hit it with requests. However, that wasn’t going to work this time. We needed the server to be local in relation to the controller; I could’ve hosted a RESTful service on my laptop, but c’mon that is so 2009 … so we went with something smaller, something from this century.
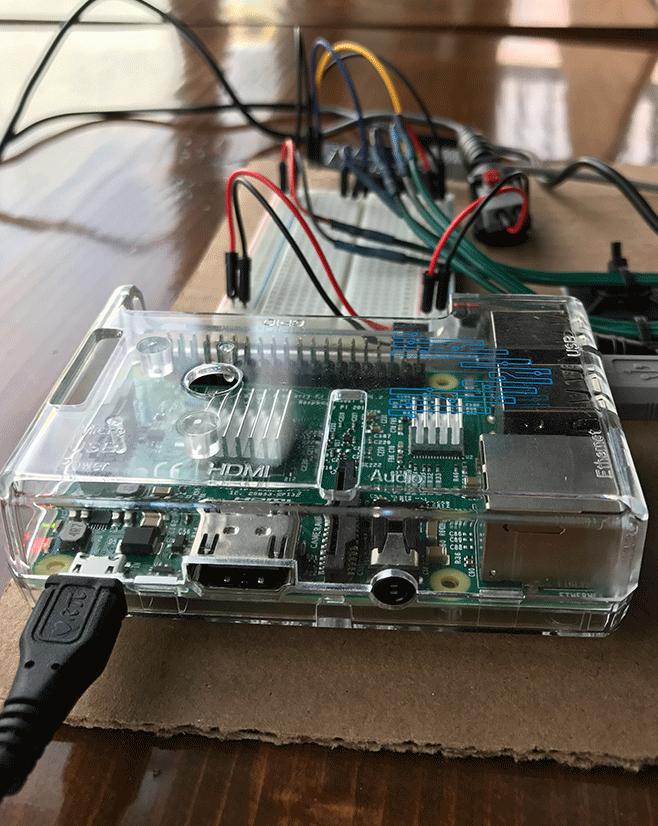
Enter Raspberry Pi 3
We needed something powerful enough to run the C++ FC server and the Node.js RESTful API. The newest PI certainly seemed to be an excellent candidate and proved to be up for the task. I will say that I did develop and host the Node.js API on my laptop, (I’m not one of those weirdos who writes code in a Linux shell with VIM) before I pulled the trigger on the RPI deployment.
Oh yes, if you’ve been following this closely; we now had a Node.js RESTful service on a Raspberry Pi that could handle requests from the local network, send commands to the FC server and do “strange things” with the LEDs. This was getting good. Now you see where this was going. We had two pieces of software and needed to have at least one other addition to let you (the user) interact with all of this wizardry. We figured it would be easier to build a react web app for your use, rather than asking you to use curl commands or postman to send requests to my Node.js API.
And Now, The Front End
Now on to the real human seeable code; the ReactJS app. We needed a javascript app that could gather user questions and somehow turn them into beautiful intelligent responses from our barely functioning LED display. This app needed to look cool and get users pumped about talking to an intelligent being, who of course resided on the other side of this wire (all just a bunch of smoke and mirrors). So, we put some real thought into getting a good design setup and assigned the task to Nolan Miller (our best ReactJS developer). But wait – there was one thing that was missing. Should we really send unfiltered requests directly from our front end to the Raspberry Pi? That seems crazy, right? I thought so too; so, I built a RESTful Java API to handle and filter all of your curiosity.
Meet William
Enter the meat and potatoes, the Java API that did all the thinking… I call him, William. This piece of Java software, needed to be able to handle users, and I don’t just mean requests; we wanted to know who these people were, along with their curiosities. Reason being, when this display goes haywire, I wanted someone to blame. Just kidding … or am I? Oh, yeah, and something about your information will be entered into a drawing for cool prizes.
I built a Java API that could handle all of the registrations, requests, retentions, and questions. The API was simple enough to build, all it really needed to do was answer the curiosities of our users. We had our team write some predefined answers for questions which are first checked by the API if the question and answer weren’t already defined, William started to think for himself. I know what you’re thinking, this is pretty freaking cool?! You’re correct… But wait, there is more. What if two or more people wanted to ask a question at the same time? Do you see where this is going? I needed a queuing system that could process people one at a time. We needed a virtual waiting line that they could stand in while William answered questions.
Enter WebSockets
WebSockets, oh how I’ve missed you. It has been years since I wrote something utilizing WebSockets, but nonetheless, I was excited to bring this protocol back into my life and into this project. We needed some form of WebSocket server that the API could use to tell the front end what William was doing. This would help users stay patient while they waited for William to answer someone else’s question. A pretty basic design, a message is sent from the Java API with some queue information, the front end parses that data and then tells the user what the status of their question is.
Now for the big picture
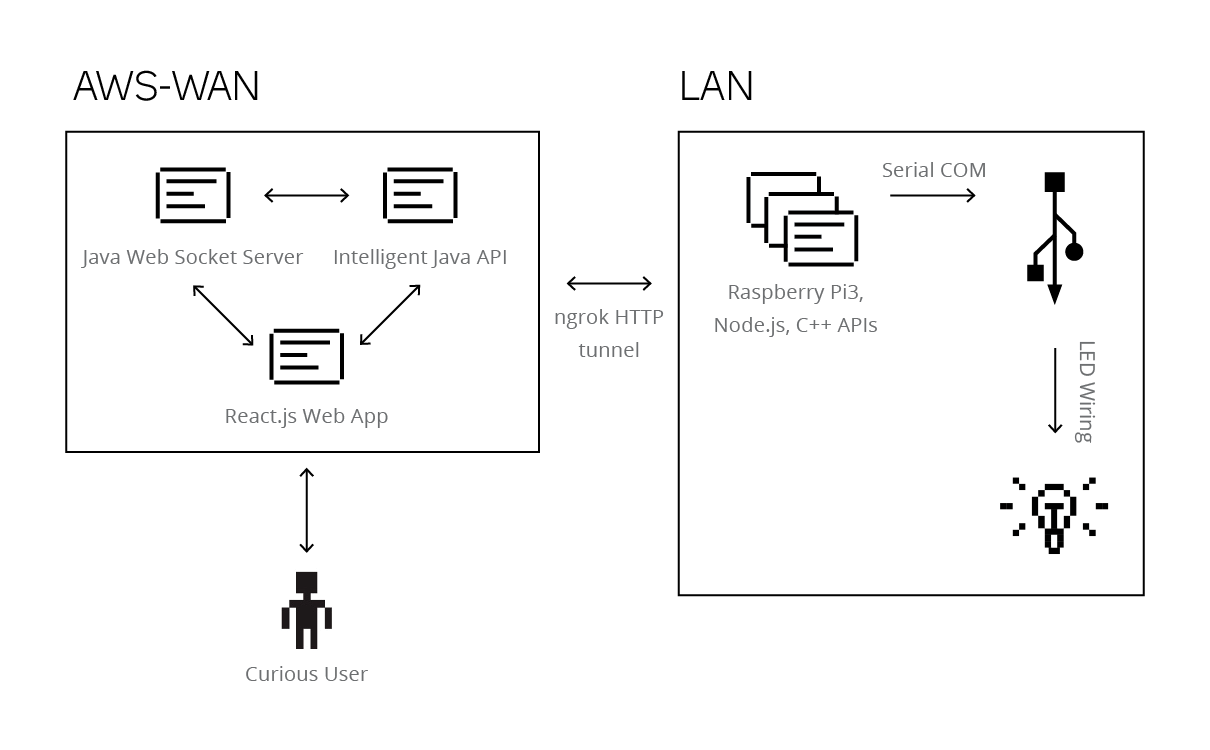
If you’ve been counting on your fingers or toes, you should now know that we have several separate entities that bring this project to life. So let me explain to you how all of this fit together.
Hardware
- Raspberry Pi
- FadeCandy USB controller
- AWS EC2 instance
Software
- C++ FC Server
- Node.js RESTful API
- Java RESTful API
- Java WebSocket Server
- ReactJS Web App
How they all work together
The ReactJS app sends a question as an HTTP request to the Java API. The Java API processes the question, finds an intelligent answer (whether predefined or acquired) and adds it to the queuing system. The Java API sends this queue data to the WebSocket server, which broadcasts the data to all of the connected clients (each instance of the ReactJS app). Once the question is next in the queueing system, the Java API sends the answer to the Node.js server running on the Raspberry Pi. This request is tunneled through an ngrok HTTP tunnel, allowing us to avoid dealing with unnecessary routing configurations. The Node.js API sends commands to the C++ FadeCandy server through a serial connection (USB) which sends commands to the FadeCandy controller ultimately resulting in the LEDs reacting.
To see how all of this hardware and software plays so nicely together to create a strange interactive experience, come by our booth at TechFestNW or stop by our Open House during Design Week Portland.