Why Do We Need Concurrency?
When managing large quantities of records with Core Data, lengthy data reads (fetches), writes (saves), and manipulations can result in long-running tasks. A consequence of performing a long running task on the main thread is a frozen user interface, something you definitely don’t want in your application!
Thread Confinement Pattern Vs. Parent-Child Pattern
Apple has developed several solutions to this problem. The more recent is the Thread Confinement and the Parent-Child concurrency patterns. Both solutions introduce Multiple Managed Object Contexts (MOCs) to the Core Data Stack.
Thread Confinement means that there can only be one Managed Object Context (MOC) per thread, and it utilizes notifications and merging to maintain coherence between the multiple MOCs. So, if you see code that uses dispatch_async and NSNotifications, it is using the thread confinement solution.
After iOS5, Apple introduced the Parent-Child context solution. In this method, each MOC has its own Grand Central Dispatch (GCD) queue. So, just like in GCD, any thread can create a block of work to be processed by a designated queue. In this case, it is the MOC queue. Once the work is done, execution is returned to the calling thread. To maintain coherence between the MOCs, instead of merging and sending notifications, the MOCs are nested in a parent-child relationship. When a save is performed in the child, the changes are pushed to the parent and this maintains coherence.
Which pattern should be used? With resources and opinions citing the benefits of both solutions, it can be difficult to know which to choose. It was difficult for me! But according to Melissa Turner in her WWDC 2014 What’s New in Core Data Talk, “NSThreadConfinement is pretty much obsolete… as we move forward, it’s likely that there will be more kinds of changes that … only work for contexts that are using the [new] concurrency types”. I took that as my cue to stick to the Post-iOS5 method and we explore this method in this blog. You can download or clone the full project for this blog from GitHub HERE.
What to Expect From this Blog
This blog aims to take you from novice to proficient with the Parent-Child concurrency pattern. It will familiarize you with a few implementations of the Parent-Child concurrency pattern and show you how these varying implementations can improve app performance in different ways.
We’ll look at three Core Data models:
- A basic core data stack with a single MOC. We’ll it the Single MOC Model.
- A simple Parent-Child model with two MOCs. We’ll call the Double MOC Model.
- A slightly more complex “writer” Parent-Child model with three MOCs that was popularized by Core Data expert Marcus Zara. We’ll call it the Writer MOC Model.
Performance of each model will be tested and compared by looking at the execution times of Core Data operations and their effect on the user interface given large amounts of data.
If this sounds intimidating, do not fear! This project is about as bare-bones as a Multi-Context Core Data app can get. Only a very basic understanding of Core Data and the UITableViewController is required. Unfortunately, this does mean that some cool Core Data enhancements (like the NSFetchedResultsController for example) have been left out.
By the end of this blog I want you to:
- See how using concurrency can improve performance of Core Data applications.
- Feel comfortable using the Parent-Child concurrency pattern.
- Know how to use the Parent-Child concurrency pattern in a way that is appropriate for your application!
Basic Rules of the Parent-Child Pattern
Before we delve into the different MOC stacks we’ll be experimenting with, let’s go over some basics about the Parent-Child method of handling Multiple MOCs.
- It uses the NSMainQueueConcurrencyType & NSPrivateQueueConcurrencyType.
- A save in a child MOC pushes changes up to the parent.
- The “root” MOC is the MOC whose parent is the persistent store.
- A save in a “root” MOC pushes changes to the persistent store.
- It uses PerformBlock or PerformBlockAndWait to dispatch work to the MOC’s queue.
- Perform blocks are nested.
I’d give you a description of the concurrency queue types and the perform blocks listed in rules 1 and 5 I’d give you a description of the concurrency queue types and the perform blocks listed in rules 1 and 5, but I’d mostly be regurgitating Apple’s documentation. So, check it out directly instead. The descriptions are very straight forward.
If these rules don’t mean to much to you now, don’t worry! They’ll make more sense as we move through examples. For now, just keep them in mind.
Three Core Data Stacks
As mentioned earlier, we’ll be experimenting with three CoreData MOC models. Let’s get an visual idea.
The first model includes a single MOC in the Core Data stack. You are given this arrangement out-of-the-box when you create a new application and check Core Data. Here is an illustration of the structure:

The image above was taken directly from the Core Data stack section of the iOS Developer Library. If this diagram is way over your head, I encourage you visit Apple’s documentation!
The second arrangement includes a MOC initialized with the NSMainQueueConcurrency type, whose operations run on the main thread, and a temporary MOC initialized with the NSPrivateQueueConcurrency type, whose operations run in a private thread. We’ll refer to the MOC initialized with the NSMainQueueConcurrency type, whose operations run on the main thread as the main MOC in this blog. Here is an illustration of the Double MOC Model:
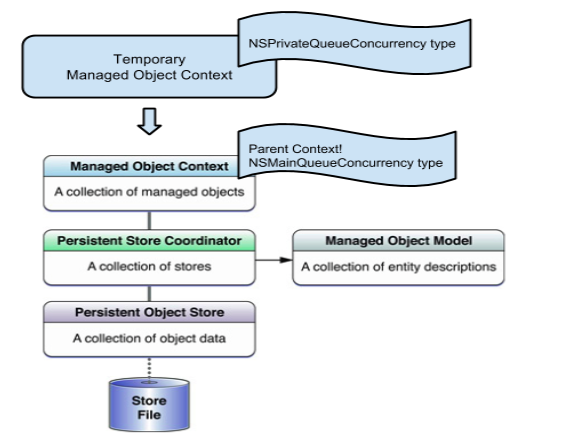
Only minimal changes were made to the stack. All we’ve done is changed the concurrency type of the original MOC and add a second MOC as its child. No other parts of the Core Data stack were modified!
The third and last arrangement also includes a MOC initialized with the NSMainQueueConcurrency type and a temporary MOC initialized with the NSPrivateQueueConcurrency type. However, it expands upon the Double MOC Model by adding a third “writer” (more on this later) MOC with the NSPrivateQueueConcurrency type. Check out the Writer MOC Model here:

Don’t be intimidated by the multiple Managed Object Contexts. It’s more “manageable” (haha..jokes) than it looks. All we have done is designate the tasks that would be performed by a single MOC to three MOCs:
- the temporary MOC performs operations that would be too lengthy to perform on the main thread
- the MOC with the NSMainQueueConcurrency facilitates UI updates
- the “Writer” MOC is specifically in charge of writes to the store.
You may wondering why we need a MOC solely for writes. When dealing with large quantities of data, a write to the store can have the longest execution time.
SHOW ME THE CODE!!
This is where some of you may be thinking, “I need to see the code for these stacks!!” Conveniently, Core Data template code is placed in your AppDelegate when you start a new Core Data project. That’s half the code right there! Beyond that, the only thing you need to do in your AppDelegate is modify the MOC specific template code.
Below is the MOC code in the AppDelegate for the basic (single MOC) Core Data stack:
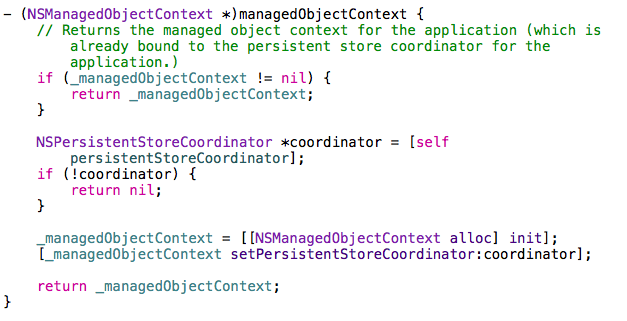
If you used Core Data, this should look familiar to you; it is out-of-the-box MOC code. It allocates a MOC and associates it with a persistent store coordinator. So, you already have the code set up in your AppDelegate to be ready to implement the Single MOC Model.
Below is what the MOC code in the AppDelegate looks like for the Double MOC Model:
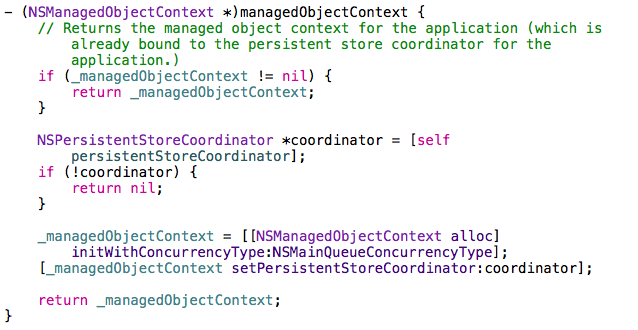
Here, we’ve deviated only slightly from the code for Single MOC Model; we’ve changed the concurrency type of the MOC to the NSMainQueueConcurrency type and that’s it! You may have noticed that there isn’t any code included for the temporary MOC. This is because the temporary MOC is generally allocated just prior to when it’s needed; It is not allocated in the AppDelegate. We’ll look at the code for the temporary MOC later.
Finally, the code for the Writer MOC Model in the AppDelegate is shown below:
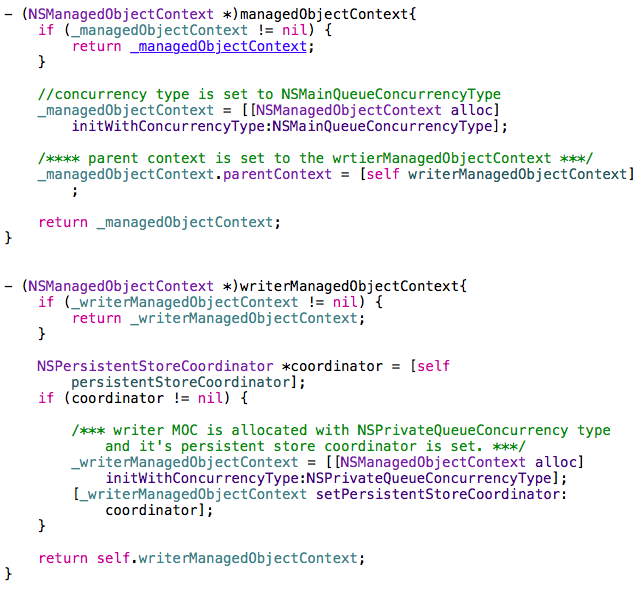
Nothing scary is going on here, but we did shift a few things around. Take a look at the illustration for the writer MOC structure again. You’ll see a writer MOC was added as a parent of the main MOC. Also, you’ll notice that the persistent store coordinator is tied to the writer MOC instead of the main MOC. These are the same changes we made in code.
EXPERIMENT OUTLINE
Now that you understand the MOC models and have the AppDelegate code needed to set them up, let’s go over our test plan for measuring the performance of each of these three models.
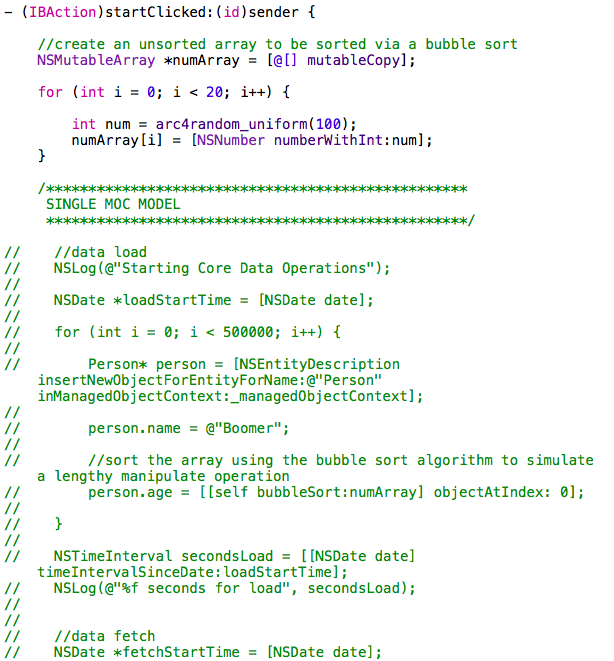
First we’ll create 500,000 entities, configure/modify them and insert them into a MOC using a simple for loop:
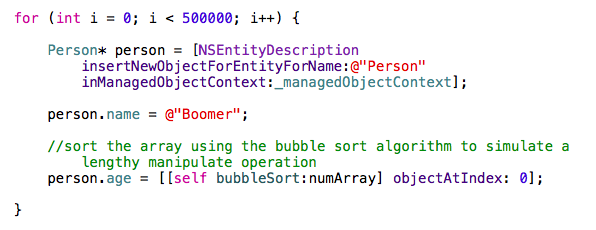
You may have noticed that we’re using a bubbleSort ( an inefficient way to sort an array) to assign our person’s age. You can totally ignore this, but if you’re interested, we’re using a bubbleSort in order to simulate a more complex modify operation. (This is certainly not something you would ever do in a real application)! In a real application, a complex modify operation may result from having a complex managed object model, a large number of entities with each entities, attributes that require computation to be assigned a value, or a combination of the above.
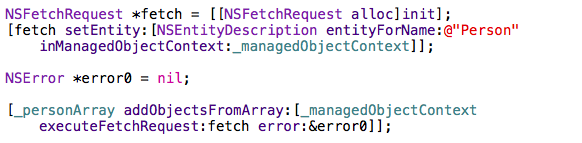
After we load our data, we perform a simple fetch (to populate our tableview):
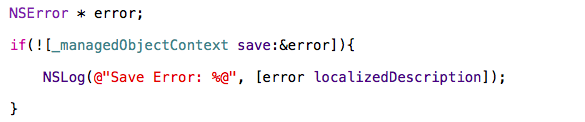
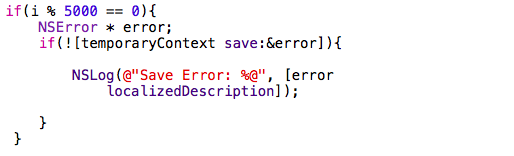
Finally, we commit/write our changes to the store by perform a save in the “root” MOC or the MOC tied the the persistent store.
Is everyone onboard? Let’s quickly summarize what we just went over and move forward:
- First, we’re going to modify/create 500,000 Core Data entities and load them into the MOC.
- Then, we’re going to read these entities from the MOC (and load them in our tableview).
- Finally, we’re going to write our data to the persistent store.
In other words, we are going to perform a create/modify , a read (fetch) , and a write (fetch) operation on our 3 Core Data stacks and see which one complete these tasks with the least amount of lag.
BEFORE WE BEGIN (IMPORTANT STUFF)
If you haven’t already, download or clone this project HERE. Otherwise, you won’t be able to follow along. However, you can still see the results without cloning or downloading the project if you choose not to.
When running the project, it is best to do so on a simulator rather than a device because of the long-running tasks we will be performing. Also, after every run, make sure to delete the application before running it again. Data stored in Core Data’s database will persist through runs. So, re-running the code without deleting the application will add more data each run and significantly change results.
Just to warn you, if you decide to (ignore my advice and) run the application on a real device, you will find execution times to be dreadfully slow. Tasks will have execution times in minutes instead of seconds. So, if you’re curious anyway, here is a tip – change the experiment parameters. Dropping the number of entities from 500,000 to 100,000 or shrinking the size of the bubbleSort array from 20 to 10, for example, will shorten run times ( and you won’t have to wait so long). It’ll take a little more work to get things going on a device, but if you have one (on second thought) by all means play with the parameters and give this a run on a device.
One last thing, make sure your console window is open. Execution steps and execution times will be logged in the console. Looking at these outputs will help you understand what is happening while the application is running.
EXPERIMENTING WITH THE SINGLE MOC MODEL
We’ll start by investigating the performance of Single MOC Model. Then, we’ll move on to test the others. Run the code on a simulator and press the “Start” button. Now, try and interact with the user interface by scrolling the table. You can’t do it! The user interface is locked due to the Core Data tasks being performed on the main thread.
Now, take a look at the console window. You should see output that looks similar to this:
2015-02-18 10:40:34.187 Parent-ChildConcurrencyExperiments[24871:1480151] Starting Core Data Operations
2015-02-18 10:40:39.255 Parent-ChildConcurrencyExperiments[24871:1480151] 5.067965 seconds for load
2015-02-18 10:40:39.551 Parent-ChildConcurrencyExperiments[24871:1480151] 0.295834 seconds for fetch
2015-02-18 10:40:44.987 Parent-ChildConcurrencyExperiments[24871:1480151] 5.432571 seconds for write
During the run shown above, the user interface was left frozen for a total of almost 11 seconds. This delay is unacceptable for most users.
EXPERIMENTING WITH THE DOUBLE MOC MODEL.
Let’s see if we can improve this poor user experience by introducing a temporary MOC. Go to the AppDelegate.m file and find the code under the comment block titled “SINGLE MOC MODEL” and comment it out. Then, find the code under the comment block titled “DOUBLE MOC MODEL” and uncomment it. Now, go to the MyTableViewController.m file repeat the same process. When you’re done the relevant code segments should look like this.
In the AppDelegate:

In MyTableView.m:
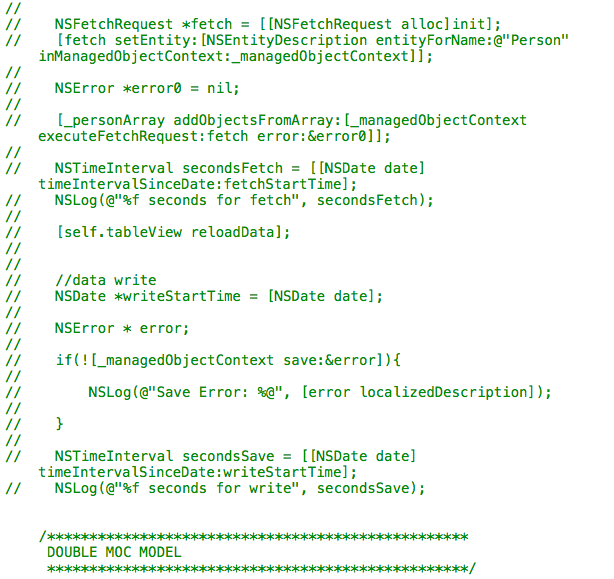

Before we break down the Double MOC Model code in MyTableViewController.m, I’ll bring down the rules from the begging for easy reference.
Parent-Child Concurrency Rules:
- It uses the NSMainQueueConcurrencyType & NSPrivateQueueConcurrencyType.
- A save in a child MOC pushes changes up to the parent.
- The “root” MOC is the MOC whose parent is the persistent store.
- A save in a “root” MOC pushes changes to the persistent store.
- It uses PerformBlock or PerformBlockAndWait to dispatch work to the MOC’s queue.
- Perform blocks are nested.
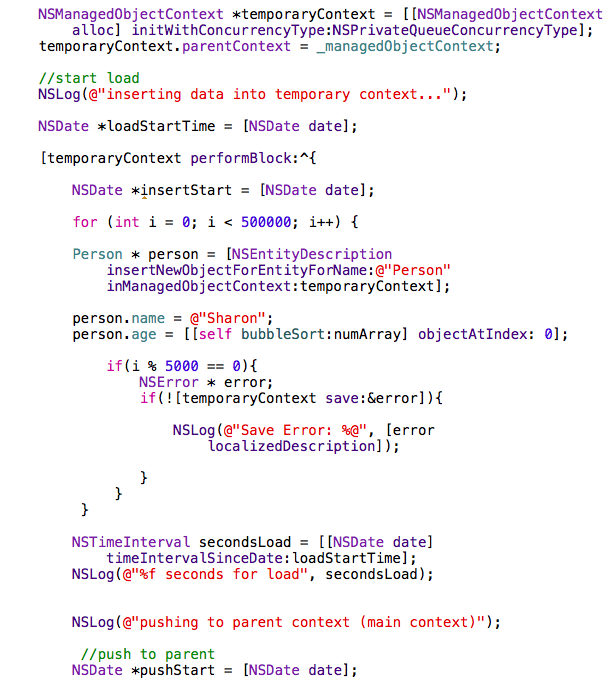
Now, lets start reviewing the first few lines of code:

The code above initializes the temporary MOC. It’s initialized with the NSPrivateQueueConcurrency type and its parentContext is set to the main MOC.
The next segment of code performs the same tasks just performed by the Single MOC Model. However, in this model the tasks are divided and delegated separately to the main MOC and the temporary MOC using performBlock (remember rule 5).
Lets ignore the tasks themselves for a moment and take a look at how the performBlocks are set up:
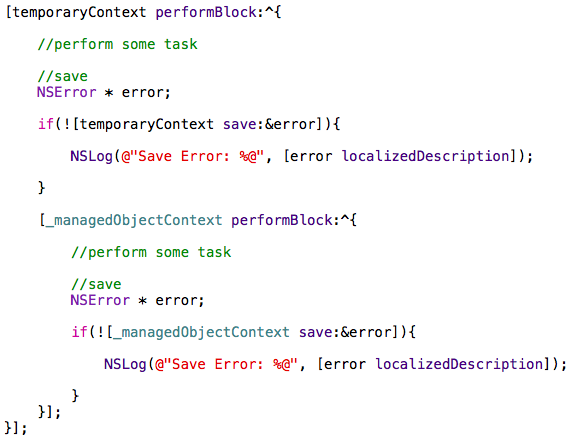
This is basic format of the Parent-Child concurrency pattern. There are multiple saves, and the performBlocks are nested.
There are multiple saves because when dealing with Multiple MOCs it’s important to maintain coherence between them. Different data in each MOC means one or more of your MOCs holds outdated data. As you can imagine, operating on or displaying stale data can be a problem. In Parent-Child Concurrency pattern coherence between MOCs is maintained by “pushing” changes from a child context to a parent context. The save you see in the performBlock of the temporary MOC pushes its changes up to its parent MOC , the main MOC, (rule 2) maintaining coherence between the 2 contexts. The save in the main MOC who is in this case the “root” MOC pushes the changes to the persistent store (rule 3 & 4).
The Parent-Child perform blocks are nested (rule 6) because we want the tasks designated to each MOC to be performed in order. For example, if a temporary MOC is to load data and a parent MOC is to fetch data (much like in our experiment) we would want to perform the fetch after the load and save. Otherwise, there would be nothing to fetch. If the perform blocks were not nested, the parent’s task and the child’s task would occur asynchronously, at the same time, and well you know why that wouldn’t produce desired results.
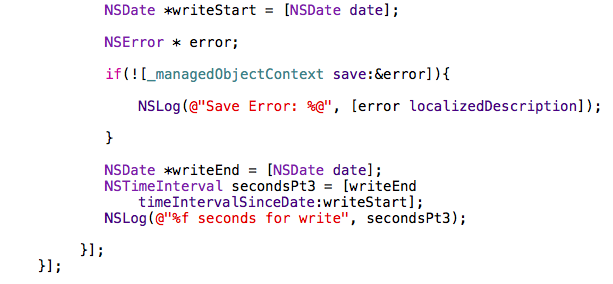
Now that we understand the mechanics of the Parent-Child pattern take a look at the work that has been designated to the MOCs in the perform blocks in MyTableViewController.m. What operations will the temporary context be performing? What Operations will be performed by the main MOC? You should be able to see that temporary context is performing the creation/manipulation and load while the main MOC is performing a fetch and a write.
The tasks themselves have not changed from the Single MOC Model with the exception of the code below:
Here, we perform incremental pushes to the parent MOC as we load the data into the temporary MOC. This is done because pushing a large amount of data to a MOC’s parent context at once incurs overhead. By distributing the saves we can mitigate this overhead. This strategy was taken from Matthew Morey whose slide share on multi-context Core Data can be found here:
Remember, the temporary MOC performs tasks on a private queue and the main MOC performs tasks on the main queue. Knowing this, what behavior do you expect to see when you run the application this time? Uninstall the app (if you haven’t already) , run the application, and press the “Start” button to see if you’re right.
This time you were able to interact with the user Interface for a few seconds after pressing “Start” before the UI became locked. This is because the first set of Core Data operations were performed by the temporary context on its private queue and did not block the main thread. Where as, the second set of operations were performed by the main MOC on the main thread which consequently blocked the user interface.
Take a look at the console output see the exact execution times of each operation:
2015-02-18 15:19:58.103 Parent-ChildConcurrencyExperiments[25626:1572538] inserting data into temporary context…
2015-02-18 15:20:07.795 Parent-ChildConcurrencyExperiments[25626:1572566] 9.691679 seconds for load
2015-02-18 15:20:07.795 Parent-ChildConcurrencyExperiments[25626:1572566] push to parent start
2015-02-18 15:20:07.866 Parent-ChildConcurrencyExperiments[25626:1572566] 0.070645 seconds to push data to parent context
2015-02-18 15:20:08.137 Parent-ChildConcurrencyExperiments[25626:1572538] 0.271078 seconds for fetch
2015-02-18 15:20:13.543 Parent-ChildConcurrencyExperiments[25626:1572538] 5.403074 seconds for write
During the run shown above, the total execution time was about 15 seconds. This is a longer total execution time than with a single MOC. However, more importantly, the user interface was only left frozen for about 5 seconds during the write operation. This is a 6 second improvement from the Single MOC Model! Although this still isn’t ideal, the user can now freely engage with the UI while Core Data executed some of its tasks. This is a huge improvement.
EXPERIMENTING WITH THE WRITER MOC MODEL
The last model we’ll be experimenting with is the Writer MOC Model. Following the same procedure as before, comment out the code under the comment block titled “DOUBLE MOC MODEL” in the AppDelegate.m and MyTableViewController.m files. Then, uncomment the code under the comment block titled “WRITER MOC MODEL” in the AppDelegate.m and MyTableViewController.m files. Make sure you don’t miss the code in the ViewDidLoad method of MyTableViewController.m.
I won’t go as in depth in explaining the code structure here as you should already understand the basics of implementing the Parent-Child Concurrency Pattern. Instead lets just focus on what has changed from the previous model. If you recall from our previous test, the UI was still blocked due to the lengthy execution time of the write to the persistent store. This is what we are aiming to remedy by adding a “writer” MOC. By creating a writer MOC with a Private QueueConcurrency type and dispatching the write operation to its queue we can free the UI while the write to the store takes place.
Ready to see the Writer MOC Model in action? First, uninstall the application and give it a run. Then, press the start button and interact with the table as usual. What an improvement! The UI is hardly locked at all. The only time the UI is locked is briefly after the table first displays its data.
Lets look at the numbers:
2015-02-18 16:06:31.067 Parent-ChildConcurrencyExperiments[25811:1591208] 7.983569 seconds for load
2015-02-18 16:06:31.068 Parent-ChildConcurrencyExperiments[25811:1591208] pushing to parent context (main context)
2015-02-18 16:06:31.094 Parent-ChildConcurrencyExperiments[25811:1591208] 0.026884 seconds to push data to parent context (main context)
2015-02-18 16:06:31.381 Parent-ChildConcurrencyExperiments[25811:1591130] 0.286695 seconds for fetch
2015-02-18 16:06:31.384 Parent-ChildConcurrencyExperiments[25811:1591130] pushing to parent context for write (writer context)
2015-02-18 16:06:34.091 Parent-ChildConcurrencyExperiments[25811:1591130] 2.706232 seconds to push data to parent context
2015-02-18 16:06:40.486 Parent-ChildConcurrencyExperiments[25811:1591208] 6.394930 seconds for write
Although results vary from run to run, the data above is promising. The load operation took ~8 seconds and the write operation look ~6 seconds but they both took place on a private thread and did not impact the UI. The only operation that impacted the UI is the push from the main MOC to its parent, the Writer MOC, which took less than 3 seconds! That’s down from 11 seconds with the Single MOC Model. Not too shabby!
An additional benefit of including a writer MOC is that the user can interact with the fetched data a couple seconds after it is displayed. The user doesn’t have to wait for the write to complete. So, to the user, the total execution time of operations seems shorter because the write operation is virtually invisible. More specifically, looking at the console output, the total execution time was 17 seconds, which is the longest so far. However, since the user is free to interact with the UI a few seconds after the data is displayed to the table, the perceived execution time is ~11 seconds ( ~8 second load + ~3 second push).
With this model we were able to cut the UI stall to under 3 seconds without adding any perceived execution time! That, folks, is how you use that Parent-Child Concurrency pattern to increase performance of your Core Data apps ;).
CONCLUSION
Hopefully you now see the benefits concurrency can bring to your Core Data application and you feel confident in your ability to utilize the Parent-Child pattern to reap those benefits. It’s important to remember, however, that not every Core Data application gains from concurrency.
In this sample application we saw how easy it was to maintain concurrency with the Parent-Child Concurrency pattern. We also saw how utilizing the Parent-Child concurrency pattern brought UI stalls down from 11 seconds with a single MOC, to 5 seconds by adding a temporary MOC, and finally to 3 seconds using the Writer Model. However, improvements like this won’t be seen in every application. Our application dealt with large amounts of data, had lengthy data manipulations/creations, loads, and writes. Not every Core Data application does.
Other applications may have complex data manipulations and very low write times. In this kind of application, the addition of a third writer context would be unnecessary and may slow performance; you saw in the experiments that pushing to a parent context cost some execution time. Conversely, you may have a Core Data app the requires very little data manipulations but is dealing with lots of data and therefore long write times. In this scenario a temporary context isn’t really necessary and you would be better off with just a main MOC and a writer MOC. Furthermore, applications dealing with small amounts of data with simple manipulations to that data probably won’t need to use Concurrency at all.
ADDITIONAL NOTES
This Blog focused solely on the Parent-Child context as method to improve performance of Core Data applications. However, there are new APIs as of iOS8 namely Asynchronous Fetching and Batch Updates can improve the performance of some Core Data applications even more! The Asynchronous Fetch API can only be utilized via the NSPriviateQueueConcurrency type or the NSMainQueueConcurrency type. So, if using the Parent-Child concurrency pattern, opposed to the ThreadConfinement pattern, you have the added bonus of being able to integrate Asynchronous Fetching into your application if you need to. Both APIs are interesting and can provide impressive performance hikes to your application so I encourage you to check them out! :D. Thanks for reading :)!
REFERENCES
Mathew Morey Slide Share:
http://www.slideshare.net/xzolian/core-data-with-multiple-managed-object-contexts
What’s New in Core Data – WWDC 2014 Video:
https://developer.apple.com/videos/wwdc/2014/#225
Cocoanetics Blog:
http://www.cocoanetics.com/2012/07/multi-context-coredata/
http://www.cocoanetics.com/2012/07/multi-context-coredata/